Kristin Peterson: mixed media, collage, painter, artist
Showing posts with label bird. Show all posts

Thursday, July 30, 2015

mixed media bird


i am in a FB group that does art swaps and there is a smaller group of us that are called "angels" that assist when someone did not hold up their end of the bargain on the swap. i was asked to assist and make a missed swap- and this little bird is one of those....... there was someone in our group that did not receive their feathered friend. this little bird is already on its' way to her new home.

I love the fluffy yarn with trailing strings! i think i did have some other nice details on my bird. one was to hand stitch her fabric beak and another of those was to hand stitch on the edge of her lace tail. i did machine sew the lace on first and then went back over just the edge to tack the edge and a few other missed edges.


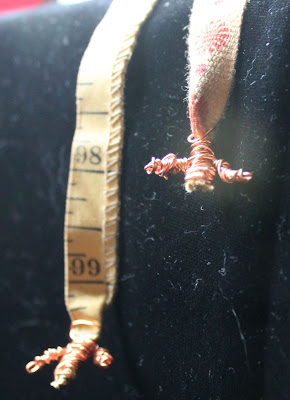
the other nice detail was the wired feet.....those make me smile. i used two different types of "ribbon" for her legs....one is a fabric tape measure and the other a cotton ribbon.


i did not want to hang her and have to attach some sort of wire or anything else to her head or back so i decided she needed to sit and added a tab on the back so she would not tip over.


her body was made from heavy 300 lb watercolor paper that i cut out the main shape of the body and started from there. her wing was made from another another type of lace. i spritz that wing with my dylusion spray ink to add a splash of color.


happy thursday!

Thursday, August 21, 2014

the blue eyed bird with fluttered wings {on fabric}

i was recently in a swap challenge where we were to create something with wings on it. now normally this should be easy, however for whatever reason i seemed to have a block for this project. or maybe there were so many ideas floating through my head that it was hard to focus on just what exactly i wanted to do.

with the deadline looming, i needed to decide on what i was making, and focus. i had been reading a past ClothPaperScissors issue and had seen cloth that had been painting on and then, sewn on and thought this may be just what i was thinking of.


i grabbed a small piece of white cotton and started by putting down some spray inks with stencils to help create my background. i used a variety of inks and a little spray of alcohol to allow some of the colorful ink to run, then going back in with some acrylic paint and finally sewing on on bird.


i did initially stitch around the outside of my square to secure the layers of fabric. i did use 2 pieces of cotton with a thin layer of fleece in between. i stitched a couple of times simply for interest and of course, not totally straight.


i did also add a vintage ribbon handle so this blue eyed bird could be hung. and finished it off with my signature.


happy thursday!

Wednesday, March 12, 2014

bird is the word for documented life.....

the 11th challenge for the Documented Life was to put a bird into your moleskin journal. this was the beginning of my page. i had used Dylusional inks and some wonderful collage papers that were on my desk.

the white off to the left side is a piece of tyvex. i have occasionally painted on tyvex with interesting results. it takes the paint very differently. i had a few scraps of left over tyvex and that was in my stash. i love how tyvex pulls apart and leaves that frayed edge.


i ripped some of the tyvex off to use on her crest and wing and add some dimension. i really like the blue polka dots on the neck and body. i am participating in 21 secrets and this past week was Rae Missigman- she was amazing and had so many great secrets that she shared with us. one of her secrets were paint pens that are available at Walmart. you can buy them individually or in packs. i bought the "bright" pack and the blue was in there....love it!


below is my whole page in my book. she is looking a little bewildered....poor thing!


Tuesday, January 14, 2014

one little word- aspire.....

our one little word for january was aspire.......i had posted my sneak peak on sunday. and truly enjoyed my whole process. i had been inspired by beginning the process with scrapbook paper. i glued that into my art journal and found some book paper i liked as well. i used gesso to push the pattern in the paper back. i then picked some of my favorite colors of acrylic paint and used them to add some additional colors.

aspire: to long, aim or seek ambitiously

once i was happy with my background, i had found papers i liked- i started my hunt for the words in my favorite book i have been using for art. i will be so sad when this book is completely used up....it has been magical. 
the other thing i knew i wanted was a bird. i found an image i liked and drew a bird and made my own stencil to use for this project.

i really like my end project. i hope you enjoy it....and you aspire to create something of your own.

if you decide you would like to play along this month- we would LOVE to see what you make of this word. come join our group and link up your project- if you do, you could be the lucky winner of a new stencil! Jessica Sporn is offering this stencil if you link up in january.....

Sunday, January 12, 2014

a new homemade stencil and a sneak peek

i had a project that was due yesterday for OLW, and was struggling to come up with a plan. thank goodness for the internet and pinterest- and its' endless possibilities and inspiration. i snooped around and found myself being inspired by layers of paper and the idea that i wanted a bird.

i have bird stamps, but, certainly not a stamp of a bird the size that i wanted and needed. so, i did the next best thing.....found a bird i liked and drew it onto some scrap paper. here is my bird......


i decided to use a sheet of scrapbook paper that i liked for my background and cut it down to fit my paper. i used gesso to push the pattern back a bit and not overwhelm my project and allow me to incorporate some additional colors.....


i used my spray ink and acrylic paints- i love the look over the gesso with the texture it provides. you can just see my bird's tail there....

at the end- i was welcoming the special charm that this project had brought to me....stop back for a full view on the 15th.

Saturday, September 14, 2013

gelli printing....paper stacking

i played in the studio with my gelli plate this week. painting, layering, printing, stacking.....

 what i have discovered is that i really like to print on patterned paper. do you have scrapbook paper that you no longer use?.....(come on....i know you do! i have a ton!!) so, get it out and print onto that.
see this light green paper with the swirls in this corner? i liked it when i bought it; still like it, but, am probably not going to use it. so i gelli printed onto it! and now i really love it because it is painted, and, i can still see the pattern. now i will cut it up to put into something else. you can see i will print onto almost anything....scrapbook paper, newspaper, deli paper, and below....patterned envelopes.
Roben-Marie was the one who turned me onto looking through the junk mail for cool patterned envelopes. like i needed one more paper thing to collect....but, i do love them! i also printed into my art journal to use as backgrounds for other drawings and what have you....check these out below.
 while printing in my art journal, i was working on multiple pages and discovered that if i used plastic 3-ring dividers that i could put those between the pages and keep working and printing. they work great and the pages won't stick together.
once you start printing you can end up with a stack of papers....i have been cutting mine up and using some of them to put in other art, like my bird below....
see my arrows? both of those paper strips are gelli printed patterned paper that i cut up to use with this painting. i also did a little sewing add texture and interest. i then, used ink to paint in the sewing and washi tape to distinguish the head.

Wednesday, July 31, 2013

homemade stencil

i am going to share how i made my woman stencil. to demonstrate the process i made a bird (which turned out cute!).....i first simply grabbed some scrapbook paper and cut out my shape. if you are not comfortable drawing and cutting your shape- journal girl had a great idea of how to get that shape you want- check this out!
 and if you look close on my stencil- you will notice some tape on his back....i did not like my first shape. he was too skinny- i like a little plumper bird- so i added a little fatness and taped that into place. and his one leg was a bit skinny; so i added just a bit to the leg to reenforce just a bit, i added some tape there too.
 you may ask why i used it before i was completely done with the process?....i wanted to verify that the shape i had cut, looked good on paper. so i did  paint around him just to verify that i did like his shape. once i knew the shape was good- i added playing cards to him to provide strength and durability.
 to add my playing cards, i used a gloss gel, but, you could use a heavier matte medium to do this step as well. it just needs to bind the cards to your paper shape. this is what i had on hand.
 once i have applied the gel, i put the cards onto the shape completely covering the shape and placing the cards as closely together as possible. i did brayer my cards once on to verify good contact and if you are worried about a sensitive area- use a clip to hold while drying.
 once dried, cut around the shape with your scissors....

some areas may be a little tight to use your scissors so i did use an exacto knife to cut out the area between his legs and to clean up the space by his beak.

 once he was completely cut out- i flipped him over and did use that same gloss gel on the back to provide a barrier on that side as well. i did not cover both sides in cards because i felt like otherwise, the stencil gets too thick- but, if you like that, feel free.....
 this was the bird painting i made then using my new stencil. he is looking very dapper!
 the background is from my gelli plate and a few layers then in between. if you give this a try- let me know! what can you make?

Friday, January 18, 2013

my bird

IMG_2759 by alteredstatesstudio
IMG_2759, a photo by alteredstatesstudio on Flickr.

here is a pic of the second bird that i made when working with the high school student. i have more squares ready to go....hoping for some studio time this weekend. this project makes me want to go out and buy more cool calendars! happy friday to you- thanks for stopping by my blog!